

I really love using PicMonkey. I have used it to edit pictures, make picture collages and also to add text to my pictures but lately I have been using it to make meeting reminders, birth announcements and now this dedication card. Before I give you the steps on how I made this I will let you know that I did purchase their Royale package...which you can try for free for 1 week!!!
Step 1
Choose Design and then I picked 5 * 7

Step 2
Your design will take you to choose a canvas color. I knew that for this one I wanted a chalk board back ground so I went to Themes - School U - Textures - Boards - Chalk Board

Step 3
I wanted a white boarder outline and this part took me the longest to figure out so that is why I am giving you some step by step to help you not take so long! It took me the longest to find where the "draw" tool was. First you go to Effects (sparkling wand)

Then down to Artsy

And open Draw
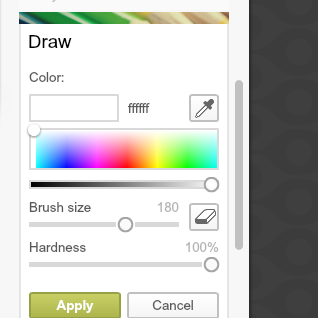
I used a 13 brush size to make my white lines. First I started with drawing the lines on the top and bottom. If you hold down the shift bar while doing this it will make your lines straight!!! However I couldn't figure out how to go up and down the side of the picture using the straight line way so I saved the two lines I did. Then I went back to Basic edits and rotated the picture. Went back to sparkly wand and did the top and bottom of the picture again using the same brush size. If they didn't connect just right I used the easer on the draw feature to undo my mistake.
Step 4
Bring in the picture you want to use. I did this using Over Lays

and choose Your Own

I stretched the picture to fill in the bottom half of the design.
Step 5
Now for the chevron pattern. I googled free chevron patters and came across ALOT of different colours for this. I choose a grey pattern for this little guy. Now in the same Overlays place you add your own again and pick the pattern you had saved to your computer. I had to do some playing around to make this one fit just the way I wanted it to. You can do that by duplicating your patterning simply by right clicking and choosing

I had to do this a few time in order to get the look I wanted. To make sure your pattern goes under your picture right click again and choose Send to back or Send backwards.

Now for the bunting. I really wish there was an easy way to do it...if you know please give me some tips! First I went to overlays

then to Geometric shapes and chose the triangle

Using this spinning feature I created my own bunting. To make more then one triangle and have them all the same size and color you simply right click and select duplicate overlay.

Step 7
Now its text time. You can find a whole lot of fonts in this program which I LOVE so I used a few different ones and lined them up and ta-da my finished product. A invitation to join us to dedicate our 4th baby!!!

I should also mention that this photo was taken by my talented friend at Mason Photography!!! If you have any step by step tutorials for projects you have done on picmonkey please let me know :)
